Please use the following search box to quickly locate valuable FAQ support guide.
You can use key words or full statement to search by. Alternatively you can simply browse by Category belowIt is highly recommended that this guide be used only by qualified IT Consultants to convert legacy Easydent4 database to EzDent-i. All proper backups must be made in advance of conversion process. Vatech America holds no liabilty in the event of failure to follow recomendations or proper adhearence to conversion process steps.
Easydent4 is NOT supported past Server 2012 R2 / Windows 7 - MSSQL will not install on any higher version. If upgrading from Windows 7 to a higher system, MSSQLServer might* still operate but is not garunteed and IS NOT supported.
Once Vatech Service has verified the Phsyical X-ray device is compatible then upgrading to EzSeries software is required to remain compliant and compatible.
Backup Guide:
If no backup is made in advance please follow these guides on DB Back Up for your Software System:
https://www.vatechamerica.com/faq/easydent4/how-to-move-or-backup-easydent4-database
Things to check first:
Update Easydent4: Version 4.1.5.9
Video Guide:
Written Guide:
Installation of EZServer
Please install EzServer on to the PC you want the EzDent-I DB to reside on.
You may find the download link for EzServer, ConsultData, and ImplantData here:
ProTip 1:
When using 4.0 or higher you will need to update the EzWebServer storage path if the default C:\Program Files (x86)\Vatech\Common\FM\FMData\ is not the location in the desired data location.
If you need to update the storage file path please follow this guide:
ProTip 2:
After updating if the Service: EzWebService does not add you will need to uninstall "EzServer" from add/remove programs, then run the update installer.
1st: Migration tool can be found in the following link:
VTMigration Tool:
Ver. 2.2.0.2_Ez4 to EzDi Downlaod: VTMigration Tool
The Migration tool is placed on the source PC with the target DB to be migrated.
2nd: Extract the Migration tool zip folder and Navigate to the Bin folder in the VTMigrator folder:
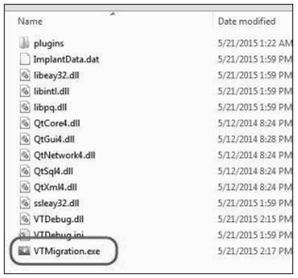
And run the VTMigration.exe to start and the Analysis screen will open:
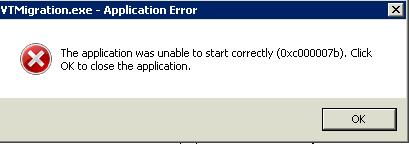
NOTE: If you get a failed to run error as shown- install EzServer locally as it will allow the migrator to run* this only occurs in some limited cases.
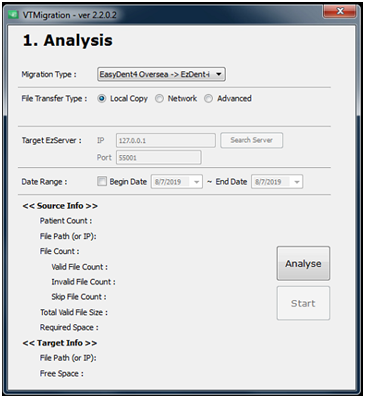
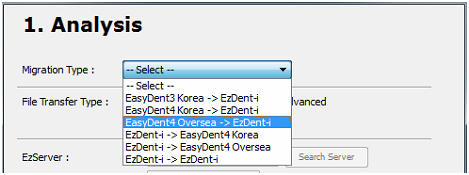
3rd: In Migration Type, select the software you want to migrate:
You must select: Easydent4 Oversea -> EzDent-i
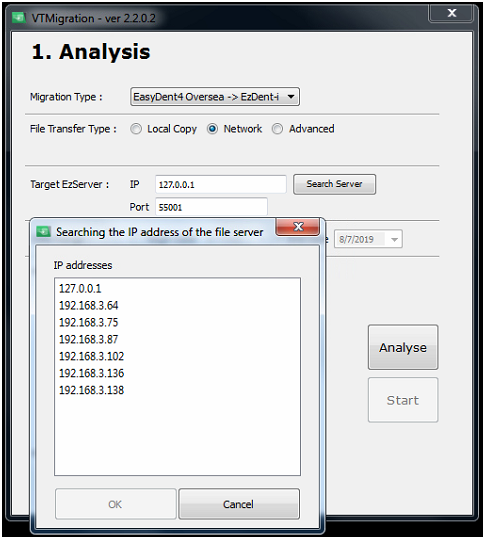
Click Search Server and locate the correct IP Address of the new target location of the EzDent-I DB.You will need to have already installed EzServer on the other target location.
You may need to change the port number to match installation of EzServer.
All versions should use the Default:55001 (unless changed manually), even for version 3.0.7 or higher* as its diagnostics port* If the diagnostics port has been changed manually then use that port*
It is recommended to keep these files as a backup.
Data Range: Range is an option for you to migrate data from a certain period only. Select this option to migrate data of a certain period. Deselect the option to migrate entire data.
Note: To migrate all database entries do not select a date range.
Click Analyse to identify any redundant patients or any other conflicts.
-If two of more patients are using the same chart number, a popup window will open.
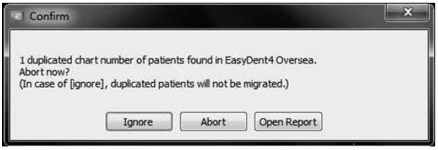
Ignore: Ignores redundant patients and proceed with migration.
Abort: Stops migration.
Open Report: Displays a report of redundant patients and other conflicts.
Once the report is done, you will get a pop up message. Click Yes to continue:
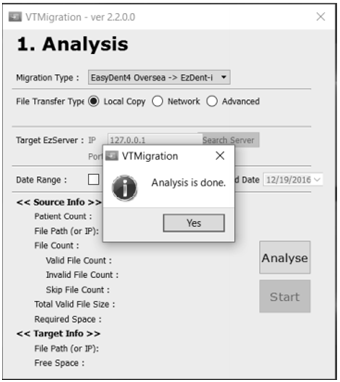
You will then get to the next step of the migration process:
Please review the Analyse Report to see which charts did not be migrated over and why.
You will need to manually import/migrate which ever charts that have conflicts.
4th: Once you are ready please press Start.
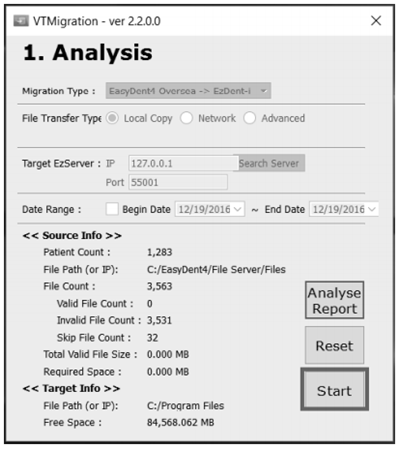
Please refer to the Appendix for more information found on the window above.
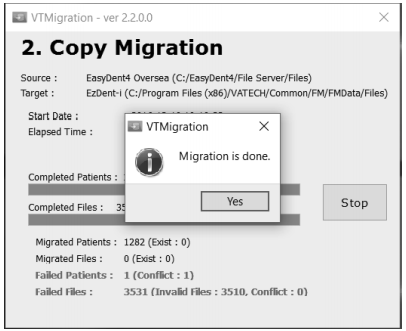
5th: When the migration is complete, you will get a Migration Report.
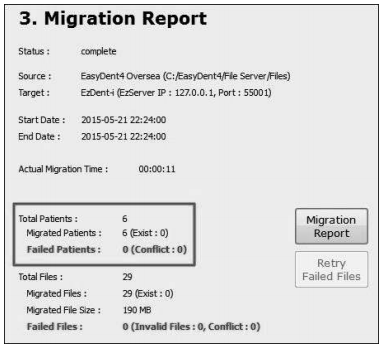
The number of migrated patients of the result report represents the number of patients whose data was successfully migrated.
The report can be found in the Report folder as “Report[Migration Date].txt”
For any failed files, you may try the Retry Failed Files button to try and migrate that data over.The report will give you the reason for the failure and you may need to manual import the Chart and files over to EzDent-I, if possible.You will now manual upload any patient charts that did not migrate over.You will also need to install the ConsultData and ImplantData (If needed) on the PC where the EzServer was installed.Crown data added to an image are not migrated. Only implant data that matches EzDent-I’s implant database are displayed on the screen.User account data in Easydent4 is not migrated.Report files are not migrated.Patient treatment data are not migrated.The images to which Gamma values are applied are not migrated.If in Easydent4 DB there are two or more patients with the same chart number, you can skip that part only and proceed or stop the entire migration as it conflicts and won’t migrate.Images that were imported, deleted will not be migrated over.
In the event CT images do not convert verify the Version of Easydent4 by Opening Easydent4 and clicking Help, About. Version 4.1.5.9, if the version is not at least 4.1.5.9 or newer you will need to update the version and rerun the conversion tool.
Note: Saved Reports will not migrate over as they are not compatible.
Source Info: Source environment analysis info
Patient Count: Total number of patients for migration (duplicate patients are excluded)
File Path (or IP): Source file path for migration
Fie Count: Total number of images for migration
Valid File Count: Number of valid image files
Invalid File Count: Number of invalid image files
Total Valid File Size: Total size of valid image files
Require Space: Required space for files
Target Info: Target environment analysis information
File Path (or IP): Target file path for migration
Free Space: Available disk space
Analysis Report button: Display the detailed report information of the analysis stage
Reset button: Return to the analysis setup stage
Start button: Execute migration
Updating EzSeries to Latest version:
Once the conversion is finished, then you will want to follow the Ezseries Update Guide to update the EzServer to the latest version and all PC's to matching set versions as indicated in the:
EzSeries Update Guide.
Manually Migrating Patient Files That Failed
For any failed files, you may try the Retry Failed Files button to try and migrate that data over. You may need to try it multiple times.
For any patient charts and images that did not migrate over from Easydent 4, you can manually export them and then import them into EzDent-I.
Exporting from Easydent 4
For 2D images such as Panoramas, Cephalo, and IntraOral: In Easydent 4, you will need to export them one by one.
-Open up the first 2D image in the viewer in Easydent4.
Then click File, and go to where it says Save As and select it.
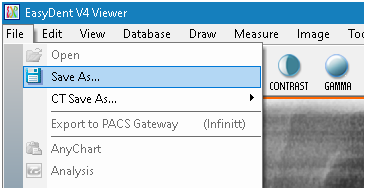
Easydent4 will then prompt you to save the scan to a directory on your PC. We suggest to place everything in a folders categorized with the patients’ name on the desktop so that it will be easier to find later on when we go to import the files into EzDent-I.
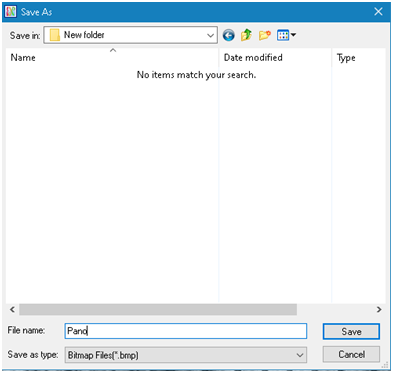
Panos will be exported as Bitmap files (.bmp)
Follow these steps for the rest of the scans that need to be manually exported.
For 3D CBCT scans: In Easydent 4, you need to click on the thumbnail of the CT you wish to export.
Then click File, and go to where it says CT Save As… and a secondary menu with pop up to the right. Select ZIP to start exporting.
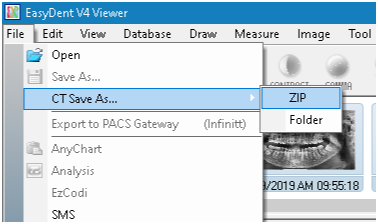
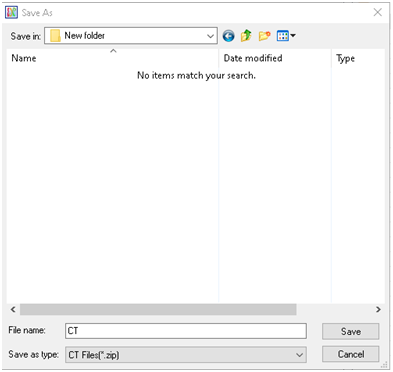
CT scans are exported as zipped files.
Follow these steps for the rest of the CBCT scans that need to be manually exported.
Importing into EzDent-I
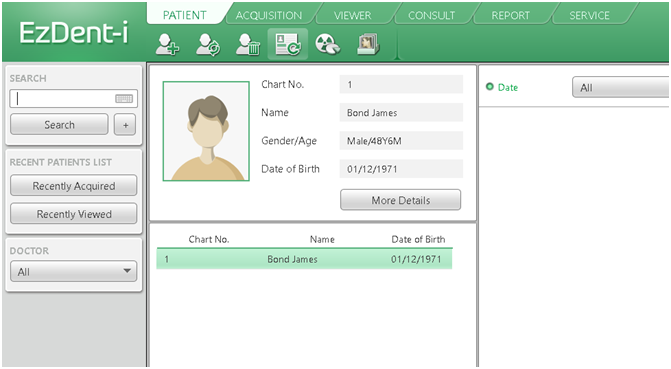
You will need to create the patient’s chart in EzDent-I with the same exact patient info. (Name, DOB, Chart Number, Etc.)
Start by clicking on the patient icon with the plus (+) sign, as marked below.

Fill out the information on the pop up window. The required information are: NAME, DOB, CHART NUMBER, and GENDER.
Note: This will be the only time you can enter the Chart Number and it cannot be edited later.
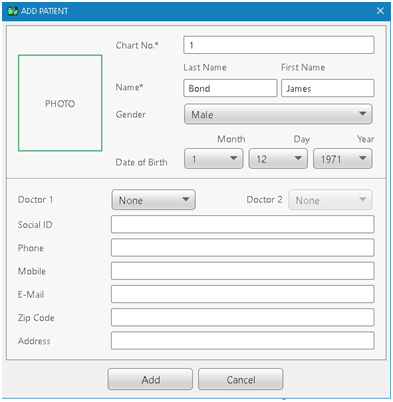
Once you are finished, click Add.
Next click the ACQUISITION tab at the top of EzDent-I to switch to the next window.
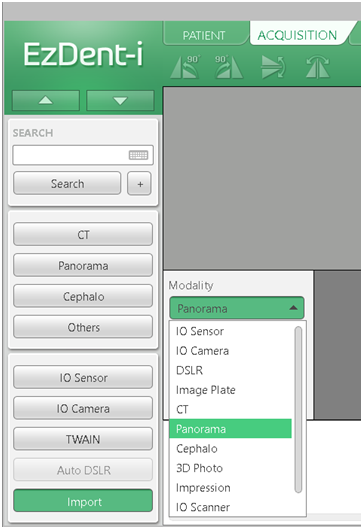
Click Import on the left side and select the Modality of the scan you are importing, i.g. Panorama, CT, Cephalo, etc.
After importing the correct scan, click Save to DB.
Continue these steps until you have finished with all the patients/images you need.
< >You will need to unzip the CT scans before you can import them.Can also adjust the date of the scan during import to match the original acquisition date and time.